> For the complete documentation index, see [llms.txt](https://multiplesx.gitbook.io/help/llms.txt). Markdown versions of documentation pages are available by appending `.md` to page URLs; this page is available as [Markdown](https://multiplesx.gitbook.io/help/how-to-start-live-trading/how-to-start-live-trading-on-kucoin.md).

# How to Start Live Trading on KuCoin?

In this guide we will guide you through  how to execute live trading through Binance. Whether you copy a trading bot or create one by yourself, the steps are similar as follows.&#x20;

[First, Obtain your exchange account's API Key and API Secret. ](#step-1-obtain-your-exchange-accounts-api-key-and-api-secret)

[Second, Copy the API Key, Secret, and Passphrase to our platform's setting page, then configure other relevant parameters.](#step-2-copy-the-api-key-secret-and-passphrase-to-the-setting-page-then-configure-other-relevant-para)

## **Step 1: Obtain your exchange account's API Key and API Secret**

### **Method A:**&#x20;

You can refer [this guide](https://www.binance.com/en/support/faq/how-to-create-api-keys-on-binance-360002502072) on how to get API key and secret of your master account.

### **Method B:**&#x20;

For the security of your funds and proper isolation, we strongly recommend that you[ create a dedicated sub-account](https://www.kucoin.com/support/900002862643) for the use of trading bots.&#x20;

&#x20;1\. Go to [**KuCoin.com**](https://www.kucoin.com/support/KuCoin.com) and click "Account Overview Sub-Account" on the header.

<figure><img src="https://2045169801-files.gitbook.io/~/files/v0/b/gitbook-x-prod.appspot.com/o/spaces%2FDS9vJOmrDctmNkM36SPX%2Fuploads%2Fa2stQ6FWLrZ9Go8v5x2m%2Fimage.png?alt=media&amp;token=0ac72f63-c760-4375-9731-88263f0c34d9" alt=""><figcaption></figcaption></figure>

2. Click Create Sub-Account, fill in the name, password, and remarks (optional) , and **make sure you have selected "Futures"** , then proceed. The name of the sub-account must be unique and cannot be modified once created.

<figure><img src="https://2045169801-files.gitbook.io/~/files/v0/b/gitbook-x-prod.appspot.com/o/spaces%2FDS9vJOmrDctmNkM36SPX%2Fuploads%2FP5bjOx11xCfR7EIhwE7b%2Fimage.png?alt=media&amp;token=7531f0f1-6aca-42ff-bb49-cb405cc2e4de" alt=""><figcaption></figcaption></figure>

<figure><img src="https://2045169801-files.gitbook.io/~/files/v0/b/gitbook-x-prod.appspot.com/o/spaces%2FDS9vJOmrDctmNkM36SPX%2Fuploads%2FqU5jmnS2xGhf25Uj1WFw%2Fimage.png?alt=media&amp;token=a3519cc2-0bec-47a3-9086-7a9808956b21" alt=""><figcaption></figcaption></figure>

3. After creating the subaccout, go to the login page and log in your subaccount.

<figure><img src="https://2045169801-files.gitbook.io/~/files/v0/b/gitbook-x-prod.appspot.com/o/spaces%2FDS9vJOmrDctmNkM36SPX%2Fuploads%2FouSaWyt9yJDlw6rUzGlx%2Fimage.png?alt=media&amp;token=31f92176-afe3-41bb-ad1a-a5e1505f2ada" alt=""><figcaption></figcaption></figure>

4. Click "Assets - Futures Account", and then "Enable Futures Trading".

<figure><img src="https://2045169801-files.gitbook.io/~/files/v0/b/gitbook-x-prod.appspot.com/o/spaces%2FDS9vJOmrDctmNkM36SPX%2Fuploads%2FEM3O5mpFByDgl2f1CQGU%2Fimage.png?alt=media&amp;token=c606d588-ac62-488a-92fe-bdb82c065fe3" alt=""><figcaption></figcaption></figure>

5. Click "More-API Services" to create API Key.

<figure><img src="https://2045169801-files.gitbook.io/~/files/v0/b/gitbook-x-prod.appspot.com/o/spaces%2FDS9vJOmrDctmNkM36SPX%2Fuploads%2FY0pOWr3DdVc9yHRr2g36%2Fimage.png?alt=media&amp;token=9f18d8a4-50ca-41b6-a0aa-1e5c6d6e25da" alt=""><figcaption></figcaption></figure>

<figure><img src="https://2045169801-files.gitbook.io/~/files/v0/b/gitbook-x-prod.appspot.com/o/spaces%2FDS9vJOmrDctmNkM36SPX%2Fuploads%2Fa8gJ2Y16rd5TSx1Zq5wM%2Fimage.png?alt=media&amp;token=7e521d23-402e-4e4f-a7a1-2abdb5f1abba" alt=""><figcaption></figcaption></figure>

6. Fill in the API name, API passphrase, and **make sure you have selected "Futures Trading" . Click "IP Restriction - Yes" and add the IP address provided by our platform here.**

<figure><img src="https://2045169801-files.gitbook.io/~/files/v0/b/gitbook-x-prod.appspot.com/o/spaces%2FDS9vJOmrDctmNkM36SPX%2Fuploads%2Fr6Fsxxq2YEvFqQ0iqQu8%2F1fdb691d6ddc7cbb809a584996e6c91.jpg?alt=media&amp;token=7ff56950-667a-420a-9b8a-21ab7c224787" alt=""><figcaption></figcaption></figure>

<figure><img src="https://2045169801-files.gitbook.io/~/files/v0/b/gitbook-x-prod.appspot.com/o/spaces%2FDS9vJOmrDctmNkM36SPX%2Fuploads%2FEDoEWzFZv5CGVBOJhyyC%2Fimage.png?alt=media&amp;token=abb40b19-6ced-4e68-8cdb-dc4eba3a1093" alt=""><figcaption></figcaption></figure>

7. Be sure to tranfer some money from master account to this sub-account's futures account before starting trading with this sub-account.

<figure><img src="https://2045169801-files.gitbook.io/~/files/v0/b/gitbook-x-prod.appspot.com/o/spaces%2FDS9vJOmrDctmNkM36SPX%2Fuploads%2F5vlruWeIgIX1u9Zho1U1%2Fimage.png?alt=media&amp;token=d873992b-4180-4998-b150-22a072a4ff47" alt=""><figcaption></figcaption></figure>

<figure><img src="https://2045169801-files.gitbook.io/~/files/v0/b/gitbook-x-prod.appspot.com/o/spaces%2FDS9vJOmrDctmNkM36SPX%2Fuploads%2FcePTaesfJhtWfVNft6EE%2Fimage.png?alt=media&amp;token=69faeb24-ff8a-4ef4-b42a-85d8e0c5fb42" alt=""><figcaption></figcaption></figure>

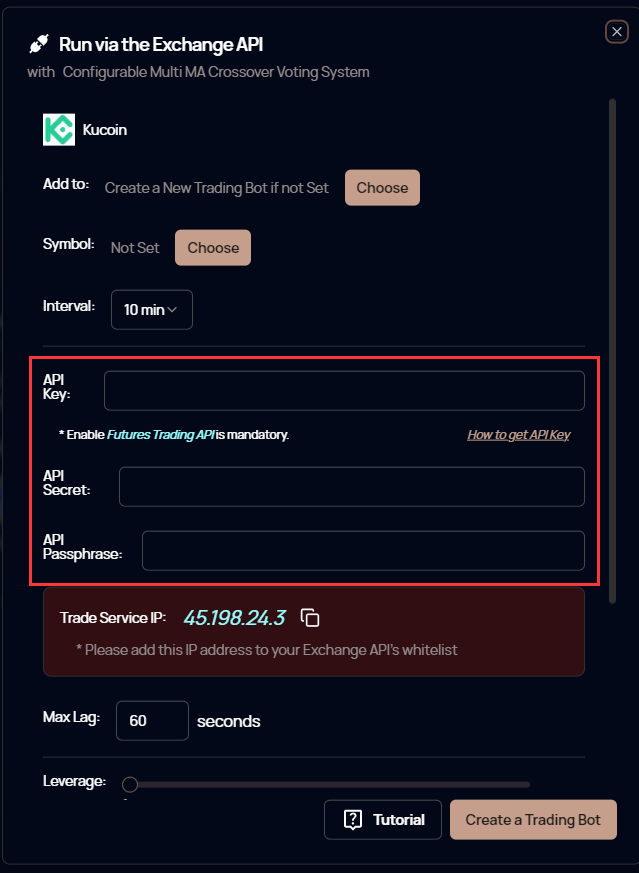
## **Step 2: Copy the API Key, Secret and Passphrase to the setting page, then configure other relevant parameters.**

<figure><img src="https://2045169801-files.gitbook.io/~/files/v0/b/gitbook-x-prod.appspot.com/o/spaces%2FDS9vJOmrDctmNkM36SPX%2Fuploads%2FI3tFNQzQ4DdoHCWRt7LA%2Fimage.png?alt=media&amp;token=91fee1bc-31c7-4b0c-bfe7-66a46cc69243" alt=""><figcaption></figcaption></figure>

After that, click "Create a Trading Bot" to start experiencing live trading.

You can view the signal trigger records on our platform's bot details page and see the actual trade records on exchange in the "Orders - Futures Trade History" column.